CI/CD Pipeline for Java Web App Using Jenkins Pipeline Script on AWS EC2

Posted as part of my DevOps learning journey | Udemy Course: Decoding DevOps – From Basics to Advanced Projects with AI
Introduction
Continuous Integration and Continuous Delivery (CI/CD) is the backbone of modern software development. It is the practice of automating the steps that take your code from a developer's laptop to a running application in production. Instead of manually building, testing, and deploying your app every time, a CI/CD pipeline does all of this for you automatically, every time you push new code.
In this blog post, I will walk you through how I set up a complete CI pipeline for a Java web application using Jenkins, SonarQube, Nexus, Docker, Amazon ECR, and Amazon ECS — all running on AWS EC2 instances. I used a Jenkins Pipeline Script (also called a Jenkinsfile) to define the entire pipeline as code. To make your learning easier, I have published the complete Jenkinsfile used in this project on GitHub — you can download it directly from this repository and use it as a starting point. By the end of this post, you will have a clear understanding of how each piece fits together and how you can replicate this setup yourself.
Credit
The Java web application used in this project is the popular vprofile-project, and the credit for building and maintaining this app goes entirely to Imran Teli. I simply used this project as the target application to demonstrate the CI/CD pipeline setup. A big thanks to the original author for making this resource available to the community.
Freestyle Pipeline vs. Pipeline Script
Before jumping into the setup, it is worth understanding why I chose a Pipeline Script over a Freestyle pipeline in Jenkins.
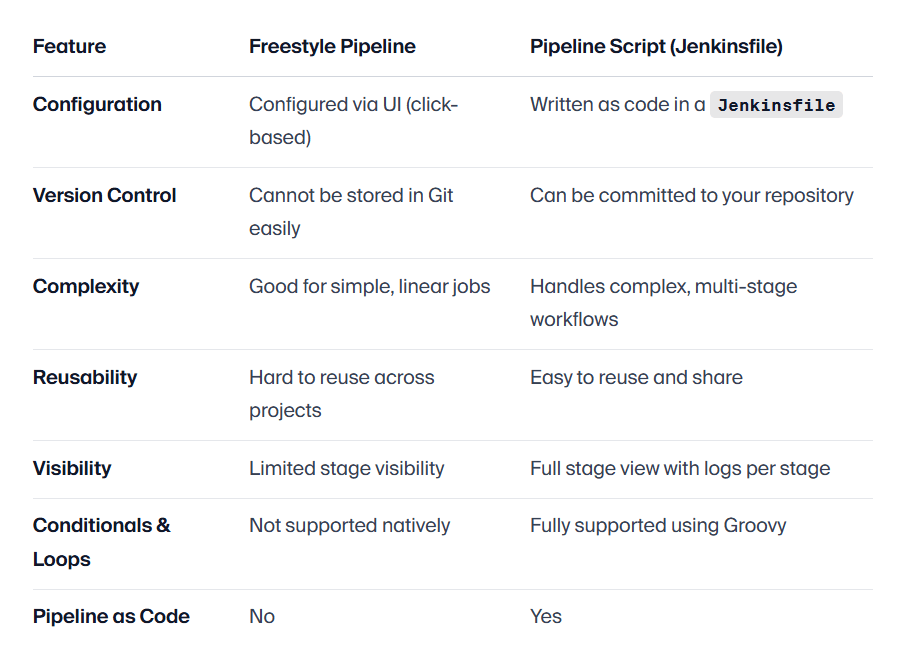
In short, a Freestyle pipeline is great when you are just getting started or need a quick, simple job. But as soon as your workflow grows — with code quality checks, artifact publishing, Docker builds, and cloud deployments — a Pipeline Script is the right choice. It treats your pipeline as code, which means it can be reviewed, versioned, and reused just like any other part of your project.
Prerequisites
Based on the Jenkinsfile used in this blog (which you can download from this repository), the following tools and services must be set up before you can run this pipeline.
AWS Infrastructure (on EC2):
- An EC2 instance running Jenkins (with Java installed)
- An EC2 instance running SonarQube (for code quality analysis)
- An EC2 instance running Nexus Repository Manager (for artifact storage)
- An AWS ECS Cluster (to deploy the containerized app)
- An Amazon ECR Repository (to store the Docker image)
Jenkins Plugins Required:
- Git Plugin
- Maven Integration Plugin
- SonarQube Scanner Plugin
- Nexus Artifact Uploader Plugin
- Docker Pipeline Plugin
- Amazon ECR Plugin
- Pipeline: AWS Steps Plugin
- Timestamper Plugin (for
BUILD_TIMESTAMPvariable)
Tools Configured in Jenkins → Global Tool Configuration:
- JDK configured with the name
JDK17 - Maven configured with the name
MAVEN3.9 - SonarQube Scanner configured with the name
sonar8.0
Jenkins Credentials Required:
awscreds— AWS IAM credentials (Access Key + Secret Key) with permissions for ECR and ECSnexuslogin— Nexus username and password stored as Jenkins credentials
SonarQube Configuration in Jenkins:
- A SonarQube server configured under Jenkins → Configure System with the name
sonarserver - A SonarQube Quality Gate webhook pointing back to Jenkins so the pipeline can wait for the gate result
Initial Setup Steps
Here is a step-by-step guide to get your environment ready before using the Jenkinsfile.
- Launch EC2 Instances — Create separate EC2 instances for Jenkins, SonarQube, and Nexus. Use Ubuntu or Amazon Linux 2, and make sure the security groups allow the necessary ports.
- Install Jenkins — Install Jenkins on its EC2 instance, install Java 17, and access the Jenkins dashboard at
http://<your-jenkins-ec2-ip>:8080. - Install SonarQube — Set up SonarQube on its EC2 instance and access it at
http://<your-sonarqube-ec2-ip>:80. Create a project with keyvprofile. - Install Nexus — Set up Nexus on its EC2 instance. Create a Maven (hosted) repository named
vprofile-repounder theQAgroup. - Create ECR Repository — In AWS Console, go to Amazon ECR and create a private repository (e.g.,
vprofileappimg). - Create ECS Cluster and Service — Create an ECS cluster and a service that uses the ECR image. The pipeline will trigger a new deployment to this service.
- Configure Jenkins Tools — In Jenkins → Manage Jenkins → Global Tool Configuration, add JDK 17 as
JDK17, Maven 3.9 asMAVEN3.9, and SonarQube Scanner assonar8.0. - Add Jenkins Credentials — In Jenkins → Manage Jenkins → Credentials, add:
- AWS credentials (Access Key ID + Secret Key) with the ID
awscreds - Nexus username/password credentials with the ID
nexuslogin
- AWS credentials (Access Key ID + Secret Key) with the ID
- Configure SonarQube in Jenkins — Under Jenkins → Configure System → SonarQube Servers, add your SonarQube server URL and name it
sonarserver. Also configure a webhook in SonarQube pointing tohttp://<your-jenkins-ec2-ip>:8080/sonarqube-webhook/. - Install Docker on Jenkins EC2 — The pipeline builds Docker images, so Docker must be installed on the Jenkins server and the
jenkinsuser must be added to thedockergroup.
Creating the Pipeline in Jenkins
Once all the initial setup is done, follow these steps to create the Jenkins pipeline using the script.
- Open your Jenkins dashboard and click "New Item".
- Enter a name for your pipeline (e.g.,
vprofile-ci-pipeline). - Select "Pipeline" as the project type and click OK.
- In the pipeline configuration page, scroll down to the Pipeline section.
- In the Definition dropdown, select "Pipeline script".
- Paste the entire content of the
Jenkinsfileinto the script editor. - Before saving, update the environment variables in the script:
- Replace the ECR registry URL and account ID with your own AWS account's ECR URL.
- Replace the
clusterandservicevalues with your own ECS cluster and service names. - Make sure the credentials IDs (
awscreds,nexuslogin) match what you created in Jenkins. - Update the
nexusUrlin the "Publish to Nexus" stage with your Nexus EC2's private IP and port.
- Click Save, then click "Build Now" to trigger the pipeline for the first time.
Pipeline Stages Explained
The Jenkinsfile defines 9 stages that run one after another. Here is a detailed breakdown of each stage.
Agent and Tools
This tells Jenkins to run the pipeline on any available agent (build node). It also makes Maven and JDK 17 available on the PATH for all stages, using the tool configurations you set up earlier.
Environment Variables
These are global variables used across stages. registryCredential tells Docker how to authenticate with ECR using the awscreds Jenkins credential. appRegistry is the full ECR image URL where Docker images will be pushed. cluster and service point to your ECS deployment target.
Stage 1: Fetch Code
Jenkins pulls the source code from the docker branch of the vprofile GitHub repository. This is always the first step — you need the source code before you can do anything else.
Stage 2: Build
Maven builds the project and packages it into a .war file, skipping tests for now since they run separately. If the build succeeds, Jenkins archives the .war file so it is available as a downloadable artifact from the Jenkins build page.
Stage 3: Unit Test
Maven runs all the unit tests in the project. If any test fails, the pipeline stops here and marks the build as failed. Running tests as a separate stage gives you clear visibility — you can see immediately if the failure is a build issue or a test issue.
Stage 4: Checkstyle Analysis
This runs a Checkstyle analysis using Maven. Checkstyle is a static code analysis tool that checks your Java code against a set of coding standards and style rules. The results are saved as an XML report that SonarQube will pick up in the next stage.
Stage 5: SonarQube Code Analysis
The SonarQube Scanner analyzes the source code and sends results — including code coverage, test reports, and Checkstyle violations — to the SonarQube server. The withSonarQubeEnv('sonarserver') wrapper automatically injects the SonarQube server URL and authentication token so you do not have to hardcode them.
Stage 6: Quality Gate
After the SonarQube analysis is submitted, this stage pauses the pipeline and waits for SonarQube to evaluate the results against your defined Quality Gate rules. If the code fails the Quality Gate (e.g., code coverage is below threshold, or too many bugs), the pipeline is immediately aborted with abortPipeline: true. The timeout of 1 hour ensures the pipeline does not hang forever if SonarQube is slow to respond.
Stage 7: Publish to Nexus
This stage uploads the built .war artifact to your Nexus Repository. Each artifact is versioned using the Jenkins BUILD_ID and BUILD_TIMESTAMP, so every build creates a uniquely versioned artifact in Nexus. This gives you a full history of every artifact ever built, which is very useful for rollbacks. The credentialsId: 'nexuslogin' references the Nexus credentials you stored in Jenkins earlier.
Stage 8: Build App Docker Image
Jenkins builds a Docker image from the Dockerfile located in the ./Docker-files/app/multistage/ directory inside the repository. The image is tagged with the ECR registry URL and the current Jenkins BUILD_NUMBER. A multistage Dockerfile is used here, which is a best practice — it builds the app in one stage and creates a lean production image in the final stage.
Stage 9: Upload Image to ECR
The Docker image is pushed to Amazon ECR with two tags — the specific BUILD_NUMBER tag and the latest tag. The docker.withRegistry() wrapper uses the registryCredential (which contains awscreds) to authenticate Jenkins with your private ECR registry before pushing.
Stage 10: Deploy to ECS
This is the final and most exciting stage — the actual deployment! Using the AWS CLI, Jenkins tells your ECS cluster to perform a force new deployment of the service. This means ECS will pull the latest Docker image from ECR and restart the running containers with the new version. The withAWS() wrapper injects the awscreds credentials so the AWS CLI is authenticated automatically.
This entire pipeline automates everything — from pulling the latest code, through testing and code quality checks, all the way to building a Docker container and deploying it live on AWS ECS. The complete, ready-to-use Jenkinsfile is available for download at this repository so you can plug it into your own Jenkins setup and start experimenting right away.
Conclusion
Building this CI/CD pipeline on AWS EC2 taught me how powerful Jenkins Pipeline Script can be when it is used the right way. By automating code fetch, build, test, code analysis, artifact publishing, Docker image creation, and ECS deployment, the whole delivery process became faster, cleaner, and easier to manage.
This setup also showed the real value of keeping pipeline logic in a Jenkinsfile. It makes the workflow reusable, readable, and simple to share with others, which is why I also published the file in a repository for easy download and learning. With this approach, anyone can study the pipeline, understand each stage, and adapt it for their own Java application deployment journey.